

How To Organize Vehicle Storage For Summer Solo Ov
When you’re running solo on summer overlanding trips, storage is not just about “fitting everything in.” It’s about keeping the truck balanced, the cab livable, and the gear you actually need within arm’s reach when you’re tired, hot, and parked on uneven ground. I’ve seen more trips go sideways from bad packing than from bad weather.
Our Top Picks
Affiliate disclosure: if you buy through these links, we may earn a commission at no extra cost to you.

Table of Contents
- Our Top Picks
- Quick Answer
- Start With the Solo Trip Reality: Less Gear, Smarter Gear
- Build a Storage Layout Around Weight and Access
- Use the Right Containers and Mounting Points
- Keep Summer Essentials Ready Without Clutter
- Make Room for Recovery, Cooking, and Camp Comfort
- Test Your Packout Before You Leave Pavement
- Frequently Asked Questions
Quick Answer
Organize vehicle storage for solo summer overlanding by separating your gear into daily-use, camp-only, and emergency categories, then place the heaviest items low and centered in the vehicle. Keep recovery gear, water, and first aid easy to reach, and use simple storage boxes, seat-back organizers, cargo dividers, and roof rack space only for light, bulky items. The goal is a setup that stays quiet on washboard roads, handles mud and river crossings, and lets you grab what you need without unloading half the truck.
Start With the Solo Trip Reality: Less Gear, Smarter Gear
Solo overlanding changes the rules. You do not need a second person’s worth of camp gear, extra chairs, duplicate tools, or a full kitchen setup that eats your cargo area. Summer makes it even more important to trim the fat because heat turns a cluttered vehicle into an oven, and every extra item becomes one more thing to dig through when you’re sweaty, tired, and trying to make camp before dark.
I always start by sorting gear into three piles: stuff I might use every day, stuff I only need at camp, and stuff that lives in the truck because it can save a trip. That last pile is where you keep your recovery boards, tow strap, shackles, compressor, tire plug kit, first aid kit, and a basic tool roll. If it doesn’t help you move, recover, cook, sleep, or stay safe, it probably doesn’t need to ride along on a solo summer run.
This is where a lot of people get fooled by clean-looking social media builds. A roof rack loaded with 12 boxes may look organized in photos, but in the field it means more noise, higher center of gravity, worse fuel economy, and more time climbing around in the dust. A good solo storage system feels boring. That is the point. Boring means efficient.
Build a Storage Layout Around Weight and Access
The old rule still holds: heavy gear low and centered, light gear up high. On a truck, that means keeping water, tools, food bins, and recovery gear in the bed or cargo area close to the axle. On an SUV or Jeep with rear cargo space, keep the densest items near the floor and forward as much as possible. If you stack weight too far back, you’ll feel it on steep climbs, in washboard sections, and in soft sand where every pound matters.
Think about what you need during the day versus what you need only after you stop. Snacks, sunscreen, bug spray, a hat, a headlamp, and a small trash bag should be reachable without opening every case in the back. Recovery gear can sit one layer deeper, but it should still be quick to grab when you’re in mud or airing down at the trailhead. Sleeping gear, extra clothing, and camp extras can live in the farthest or highest storage zone because you usually won’t touch them until evening.
Access matters more than people think. If your stove is buried under camp chairs, or your winch controller is packed under three soft bags, you will skip using the gear when you need it. I’ve watched people avoid a proper lunch stop because their kitchen setup was too buried. Good storage lets you live out of the vehicle without unloading it. That is the difference between a relaxed solo trip and a frustrating one.
Use the Right Containers and Mounting Points
For summer solo trips, simple containers usually beat fancy modular systems. A few tough bins, labeled clearly, are easier to live with than a maze of drawers that can jam, rattle, or waste space. In a truck bed, tie-down friendly boxes with flat lids stack better and are easier to secure under a tonneau, bed cap, or rack. In an SUV or Jeep, low-profile bins and soft bags often work better because they fit the shape of the cargo area instead of forcing wasted gaps.
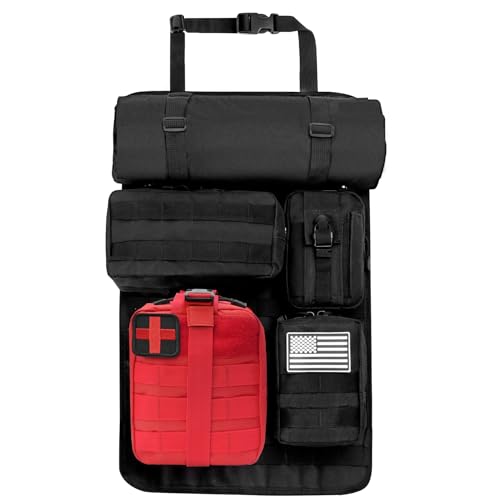
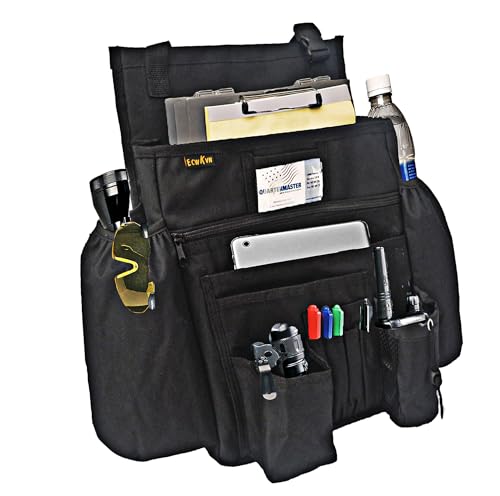
Mounting matters as much as the container. A roof rack should carry light, bulky items only: chairs, empty water jugs, a compact tent if your setup supports it, or a dry bag with light bedding. Heavy gear on top looks rugged until you hit a rocky shelf road or drop into a rut and feel the whole vehicle lean. Keep the weight down low. Use the rack for volume, not ballast. The same goes for side panels, seat-back organizers, and tailgate storage. They are great for small items, but they should not become a junk drawer hanging off the truck.
Secure everything like you expect a rough trail. Washboard will expose bad packing fast. So will braking hard on a dirt descent or crossing a shallow creek where the vehicle shifts side to side. If a bin can slide, it will. If a lid can pop open, it will. Use strap-down points, non-slip matting, and simple restraint systems that you can tighten with gloves on. It does not need to be fancy. It needs to survive real movement.
Keep Summer Essentials Ready Without Clutter
Summer solo travel has its own needs, and those needs should be front and center. Water storage is a big one. Put your drinking water where you can reach it fast, and keep extra water secured so it cannot tip, leak, or rub through on a long corrugated road. Add a small hand-wash setup if you can. After a dusty trail day, being able to clean up before cooking or crawling into a tent is worth its weight in gold.
Overland cooking gear should be stripped to the essentials for solo use. You do not need a kitchen that looks like a catering van. One stove, one pot, one pan, one cup, one plate, one spoon or fork, and a compact fuel setup will cover most trips. If your cooking gear is organized in a single bin or drawer, meal prep goes faster and cleanup is easier. That matters when the sun is dropping and bugs are coming out.
Off-road lighting and small electrical gear also need a place, but not a loose one. Headlamps, spare batteries, charging cables, and a lantern should live together in a dry container or seat-back pouch. If you rely on a roof tent or awning setup, keep the hardware, stakes, and guy lines together so you are not searching through three different bags when a summer storm rolls in. Good storage means less time hunting and more time getting camp squared away before dark.
Make Room for Recovery, Cooking, and Camp Comfort
Recovery gear deserves its own system. Recovery boards, shovel, traction straps, shackles, and gloves should be stored where you can reach them even if the truck is nose-deep in sand or one wheel is buried in mud. I prefer recovery boards mounted outside or in a place that does not require unloading camp gear to access. If they are buried under a fridge slide and a sleeping bag, they are not helping when you need them most.
Cooking and camp comfort can stay organized without taking over the vehicle. Foldable chairs, a compact table, and a sleeping bag or quilt can live in soft bags or long bins, but keep them separated so a wet chair does not soak your bedding after a river crossing or a morning dew-soaked packout. This is especially important on summer trips where humidity, creek crossings, and sudden storms can put damp gear into a sealed vehicle. Wet gear and heat can get ugly fast if you trap it in one pile.
For solo travelers, vehicle storage should also support quick exits and easy resets. When you stop to scout a trail, you should be able to lock down camp gear and move without an hour of repacking. When you leave camp in the morning, you should know exactly where the stove, recovery kit, and daily bag are located. That kind of order is what lets you travel farther with less stress.
Test Your Packout Before You Leave Pavement
The best way to know whether your storage system works is to shake it down on a short trip before you commit to a long route. Drive a few miles of washboard, a rocky trail, and some braking on a dirt road. Then open the vehicle and see what shifted, what rattled, and what you forgot to strap down. The trail will tell you the truth faster than any garage layout ever will.
Pay attention to how often you open each compartment. If you keep reaching over and over for the same item, move it forward. If you are constantly digging past things you never use, those items need to move out of the way or come home. Solo overlanding works best when your storage reflects real habits, not a perfect theory. The gear you touch all the time needs priority. The gear you might need later should not block it.
Also check your vehicle after dust, mud, and heat have had time to work on the setup. Velcro loosens, straps shift, and cheap bins flex. River crossings can leave silt where you do not want it. Summer sun can warp weak plastic and make soft-sided storage sag. A system that survives one grocery-store run is not automatically ready for the backcountry. Test it like you mean to use it.
Frequently Asked Questions
What is the biggest mistake people make with solo overlanding storage?
They overpack and bury the important stuff. Recovery gear, water, and daily-use items need to be easy to grab, not trapped under camp extras and random bins.
Should I use a roof rack for most of my storage?
No. Use the roof rack for light, bulky items only. Keep heavy gear low in the vehicle so handling stays stable on rocks, sand, and rough washboard.
How do I keep gear from rattling on rough roads?
Use tight-fitting bins, strap everything down, and add non-slip material under containers. If it can move on pavement, it will be a mess on dirt.
What should always stay within arm’s reach?
Water, snacks, headlamp, first aid, phone charger, and recovery basics. Those are the items you may need quickly when you are tired, hot, or dealing with a trail issue.
Is a drawer system necessary for solo overlanding?
Not always. Drawer systems are nice if they fit your vehicle and budget, but simple bins and smart packing often work just as well for weekend trips and mild trails.
How should I store wet gear after a river crossing or rain?
Keep wet items separated in a dedicated bag or bin and air them out as soon as you can. Never trap damp recovery gear or bedding together in a sealed cargo area for long.
For summer solo overlanding, the right storage setup is the one that keeps weight low, gear organized, and your most-used items easy to reach when conditions get ugly. Keep it simple, test it on rough roads, and cut anything that adds clutter without adding function. My recommendation: build a lean, low-mounted system with clearly separated camp, recovery, and daily-use zones. Best for weekend warriors is a straightforward bin-and-bag setup; best for dedicated overland builds is a more permanent layout with secure mounts, external recovery storage, and a rack used only for light cargo.


