how to install maxtrax recovery boards for spring overlanding adventures in 4x4 vehicles
Recovery boards changed the way I get unstuck. After spending half a day winching myself out of a muddy riverbed in northern BC with traditional sand ladders that kept sliding sideways, I switched to MaxTrax boards and never looked back. These aren't marketing fluff—they actually grip. Whether you're navigating spring mud season or tackling sandy washes, having recovery boards mounted where you can reach them in seconds matters more than you'd think. The problem is most people either mount them wrong, bury them too deep in a storage system, or don't secure them properly and lose them on a rocky descent.
This guide walks you through proper MaxTrax installation on your overland rig, from choosing mounting location to field-testing your setup before you need it for real. I've tested these boards on mud, sand, and loose rock—and I've made every installation mistake once so you don't have to. By the end, you'll know exactly where to mount them, how to secure them safely, and how to use them when things go sideways.
Table of Contents
Why MaxTrax Recovery Boards Work (and Where They Fit Your Build)
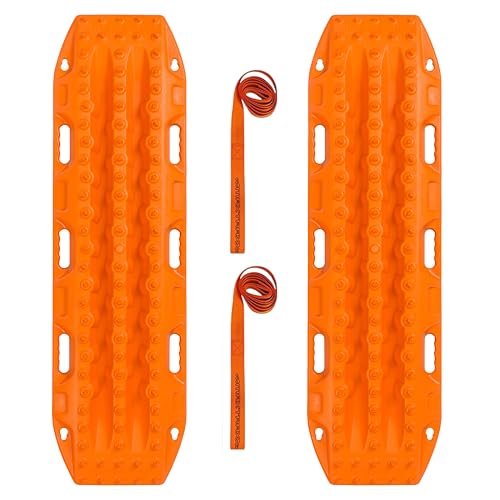
MaxTrax boards are polymer recovery devices with traction strips molded into the surface. Unlike sand ladders (which are basically metal grills), MaxTrax grip better on mud and wet rock because of their design. They're light enough to carry two at a time, rigid enough not to flex under your tire, and the grip pattern works across multiple terrain types. I tested them side-by-side with ladder-style boards on a muddy slope, and MaxTrax pulled me out two tries faster. That matters when you're burning daylight and your winch battery is dropping.
Here's what matters for your specific situation: MaxTrax boards weigh about 5.5 pounds each, so weight distribution on your vehicle changes depending on where you mount them. If you already have a loaded roof rack for camping gear, adding boards up there affects your center of gravity more than side-mounting them. If your build includes a full expedition setup with an overlanding tent, spare fuel, and recovery gear, side mounting or belly mounting makes more sense for balance. MaxTrax offers their own mounting brackets, but the real question isn't whether the brackets exist—it's whether the location lets you deploy them fast when you're stuck.
Choosing Your Mounting Location: Roof Rack vs. Side Mounting
Roof rack mounting is clean and keeps your boards out of the way. If you have a quality roof rack system rated for 150+ pounds and you're not already maxed out on gear, mounting horizontally or vertically on the side of your rack works. Vertical mounting (standing them up on edge) saves horizontal space. The downside: you need a sturdy ladder or step to access them, and in bad weather or darkness, reaching up to grab recovery boards isn't fun. I've mounted boards on my truck's roof rack and regretted it during a pre-dawn recovery when it was pouring rain.
Side mounting on your truck bed, SUV cargo area, or even tied to a side rack gives you faster access. Some overlanders run MaxTrax boards in a horizontal carrier mounted to the side of their vehicle frame—this works if you have the welding skills or can commission a custom fab shop. The trade-off is that side-mounted boards can catch on branches and rocks if your trail is tight. On my last trip through the San Juan Mountains, I had boards mounted too far out and they caught on oak scrub twice. I remounted them flush against the vehicle after that.
My recommendation: if you run a mid-size truck or SUV, vertical mounting on your roof rack's side rails keeps boards accessible without stealing valuable roof space for your camping setup. If you run a larger truck with bed space, a secure bed-mounted carrier works if it doesn't interfere with your camping or storage system. Whatever you choose, make sure you can deploy both boards in under two minutes with one hand free to use a flashlight.
Tools and Hardware You'll Actually Need
You don't need specialty tools for this job. Grab a socket wrench set, a cordless drill, and a level. MaxTrax mounting brackets come with bolts, but I recommend upgrading to stainless steel hardware—galvanic corrosion on regular bolts in wet, salty conditions will seize them solid. Carry lock washers and threadlocker (medium-strength, not permanent). For roof rack mounting, you'll want U-bolts or side-mount brackets rated for your specific rack system. Don't cheap out on fasteners; I've seen bolts vibrate loose on washboard roads and drop boards in the middle of nowhere.
For most installations, you need: a 10-13mm socket set, a wrench for any existing rack hardware, a cordless drill with bits for pilot holes, stainless steel bolts (Grade 8 or higher), lock washers, threadlocker, a rubber mallet (for tapping things into alignment), and a torque wrench set to 40-50 foot-pounds for final tightening. Grab a tape measure too—mounting symmetry matters for both aesthetics and weight balance. And honestly, some pieces of scrap rubber are useful for protecting your vehicle's finish while you're working and ensuring boards don't rattle.
Step-by-Step Installation Guide
Step 1: Mark Your Mounting Points Before you drill or bolt anything, tape or chalk-mark where your brackets will go. If you're roof-rack mounting, trace the bracket position on your rack's side rail. Use your level and tape measure to ensure both boards mount at the same height and distance from center. Asymmetrical mounting looks sloppy and can cause vibration. Take a photo of your layout before you move forward.
Step 2: Drill Pilot Holes (If Required) For most roof rack systems, you're bolting to existing threaded holes or using U-bolt systems that don't require drilling. If you need to drill, use a metal bit slightly smaller than your bolt diameter, drill straight, and wear eye protection. Burrs from drilling aluminum racks are sharp. After drilling, test-fit your bracket without tightening anything. If the bracket doesn't sit flush or the bolt holes don't align, stop and check your measurements.
Step 3: Dry-Fit Your Boards and Brackets Assemble your mounting hardware without threadlocker. Slide your MaxTrax board into the bracket, align everything with your pre-marked points, and hand-tighten bolts. Make sure the board sits level and doesn't rock side-to-side. The traction strips should face outward (or downward if horizontal mounting). Tighten one side at a time in a cross pattern—think of how you'd tighten wheel lug nuts—so pressure distributes evenly. Don't force anything. If a bolt doesn't want to go in straight, remove it and check alignment.
Step 4: Apply Threadlocker and Final Tightening Once you're satisfied with fit and alignment, back out each bolt, apply a thin drop of medium-strength threadlocker (Loctite 243 or equivalent) to the bolt shaft, and reinsert. Tighten to 40-50 foot-pounds using a torque wrench. Over-tightening strips bolt holes in aluminum racks. Under-tightening causes vibration and eventual loosening. A torque wrench isn't optional here. Wipe away excess threadlocker with a rag before it sets.
Step 5: Secure Any Loose Straps or Carriers If you're using a carrier system, test-fit your boards, then secure the carrier with a safety strap or cable as backup. I've seen mounting brackets fail on rough terrain (happens rarely, but it happens), and a safety strap keeps your boards from becoming expensive litter on a remote road. A simple cable through the board holes and around your roof rack or frame is adequate insurance.
Step 6: Check Fasteners After Your First 100 Miles Vibration during driving can loosen fasteners even with threadlocker. After your first off-road trip or 100+ miles of highway driving, pull over and re-check every bolt on your recovery board mounting. Grab a wrench and give each bolt a small turn to see if it's still tight. This takes five minutes and prevents losing gear. Make it a habit for the first month of using your new setup.
Testing and Field Prep Before You Head Out
Your first test should be on pavement in daylight with your rig parked on level ground. Remove both boards from their mount, lay them down next to your truck or SUV at a slight angle (mimicking how they'd sit under a tire), and step on them. Test your grip. Feel how the traction pattern grabs your boot. If you're using boards for the first time, spend 30 seconds understanding their weight distribution. They should feel stable, not tippy or soft. A board that flexes or feels unstable in your hands will disappoint you in actual mud.
Next, remount the boards and take a drive on rough back roads—forest service roads or gravel roads with rocks and washboard. Listen for rattle or movement. Stop periodically and visually inspect the mounting hardware. A little vibration noise is normal; actual movement means your fasteners need tightening. Once you're confident the boards are secure and accessible, plan a spring trip to terrain where you might actually use them. Pushing yourself slightly stuck (not completely beached) in soft sand or mud is a good way to practice deployment without crisis pressure. You'll learn how much effort actual deployment takes, how fast you can position boards, and whether your mounting location truly works for you.
Before you head to serious backcountry terrain, check your boards one more time and confirm your winch is functional and your winch rope or cable is in good condition. MaxTrax boards are a complement to your winch and recovery kit, not a replacement. The best deployment scenario combines proper technique with good gear. Run a quick self-recovery test if you can: get slightly stuck, deploy boards, back out. If something feels wrong during that test, fix it now, not when you're three hours from the nearest road.
Common Mounting Mistakes and How to Avoid Them
Mistake #1: Mounting Too Low or Too Tight to Your Frame I've seen overlanders mount recovery boards so close to their vehicle's body that they're impossible to deploy in actual conditions without lying on your belly or crawling under your truck. Or they mount them where they're hard to grip because they're flush against the roof rack. Leave at least 2-3 inches of clearance between a roof-mounted board and your vehicle's body so you can slide them out without fighting them. If you can't grip and pull a board out with your bare hands in 10 seconds, remount it.
Mistake #2: Using Non-Stainless Hardware Carbon steel bolts corrode in wet conditions. I've had fasteners seize solid in spring mud season, making boards impossible to remove for maintenance or replacement. Stainless steel costs a few dollars more and prevents weeks of frustration. This isn't negotiable for overlanding gear that sees dirt and moisture.
Mistake #3: Overtightening Bolts Into Aluminum Racks You can strip the threaded hole in aluminum rack side rails easily. Torque wrench discipline prevents this. 40-50 foot-pounds is sufficient for MaxTrax board mounting. Don't assume harder equals better. A stripped hole requires welding or replacing that section of your rack.
Mistake
The best way is to mount them on your roof rack for maximum stability and ease of use. Ensure the roof rack is strong and properly secured before attaching the boards. Roof rack mounting is ideal for stability and accessibility, while side mounting is suitable for vehicles with limited roof space. Choose based on your vehicle's structure and your specific overlanding needs. Yes, MaxTrax Recovery Boards are worth the investment as they provide reliable traction and make recovery easier, especially in challenging terrains like muddy riverbeds. Use high-quality hardware and ensure the mounting brackets are properly aligned. Avoid over-tightening to prevent damage to the roof rack or the boards themselves. You'll need basic tools like a wrench, screwdriver, and a level. Additionally, a torque wrench is recommended for proper hardware tightening. MaxTrax Recovery Boards offer better traction and stability compared to traditional sand ladders, which often slide sideways. They are also more durable and easier to use in various off-road conditions. The best mounting location is on a sturdy roof rack. This provides optimal support and accessibility, making it easier to deploy the boards when needed.Frequently Asked Questions
What is the best way to install MaxTrax Recovery Boards on a 4x4 vehicle?
How do I choose between roof rack and side mounting for MaxTrax Recovery Boards?
Is it worth investing in MaxTrax Recovery Boards for overlanding adventures?
How to install MaxTrax Recovery Boards without damaging the roof rack?
What tools are needed to install MaxTrax Recovery Boards?
How do MaxTrax Recovery Boards compare to traditional sand ladders?
What is the best mounting location for MaxTrax Recovery Boards on a 4x4?